
In this article, we continue what we have started in the previous two articles focusing on Network Automation with Ansible and NAPALM. In the first article, we introduced Ansible and how it is used in combination with NAPALM to orchestrate a Multi-Vendor network. In the Second article, we illustrated the process of developing the configuration template for different Network OS (JunOS and IOS-XR) and how to use both Ansible and NAPALM to push the configuration onto these devices. In this article, we will continue with the Validation part to verify that the configuration that was pushed to the devices was pushed correctly and as well to verify the state of the network after this change.
Why do we need to validate?
In the normal workflow that we are all accustomed to, we have a document (Network Implementation plan) which outline exactly the change we need to make and on which nodes this change need to take place. We take what is there in the document and we apply it on the network. After that, we hopefully do some sanity validation checks to verify that the change we did is as expected and that it didn’t break any existing network state.
So what is wrong with this approach?
- It is a manual work, which involves the typing of multiple commands on different nodes to get the output and compare it with the expected network state.
- If the change is big and involves multiple network elements, the verification can take a lot of time or we could skip some nodes without validation to save time.
- We are validating the network state after the change and we are the ones who are comparing the state with the expected network state, thus it is Brune to human errors.
All this workflow is error prune and takes a lot of time to be performed as well as there is no direct correlation between the desired network state and the network state after the change except in the mind of the engineer who is performing this change and reporting the results.
Network Validation with Ansible
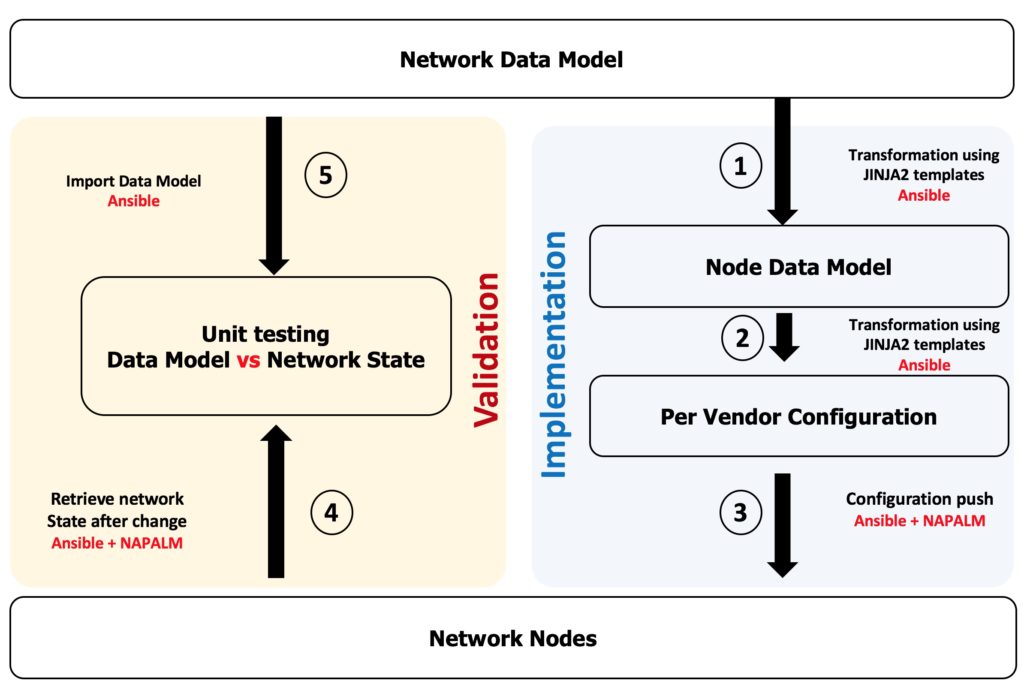
Since we automated the deployment of the configuration using Ansible and we now have a clear network design which is completely abstracted from the Vendor implementation (a YAML document which has all the parameters to describe the desired network state). We used this data model to build the per-node data model and from there we generated the vendor-specific router configuration. Having this data model for the desired network design/state we can use this model to validate the network state after the change. The below diagram outline the process of automating the network validation and how we can utilize the network data model that we built in order to validate the network state
How and What to validate?
With Ansible you can validate practically anything starting from the physical link status, up to network reachability and protocol level status. However since we are using NAPALM as our common API across different vendors, NAPALM only defined some getters (show commands and their output) for the most use cases and network states that need to be validated. In this article, we will use some of them to illustrate how the validation will be performed. This is realized using NAPALM get_facts module.
Note
This is one of use cases where if you need to add more getters to satisfy a particular use case not covered by NAPALM , you will need to extend NAPALM using python to implement this extra functionality.
With the help of Ansible and NAPALM we execute some predefined show commands on all the nodes which were configured to extract the existing network state from these nodes, then we compare the extracted network state against desired network state extracted from the network data model.
Let’s validate
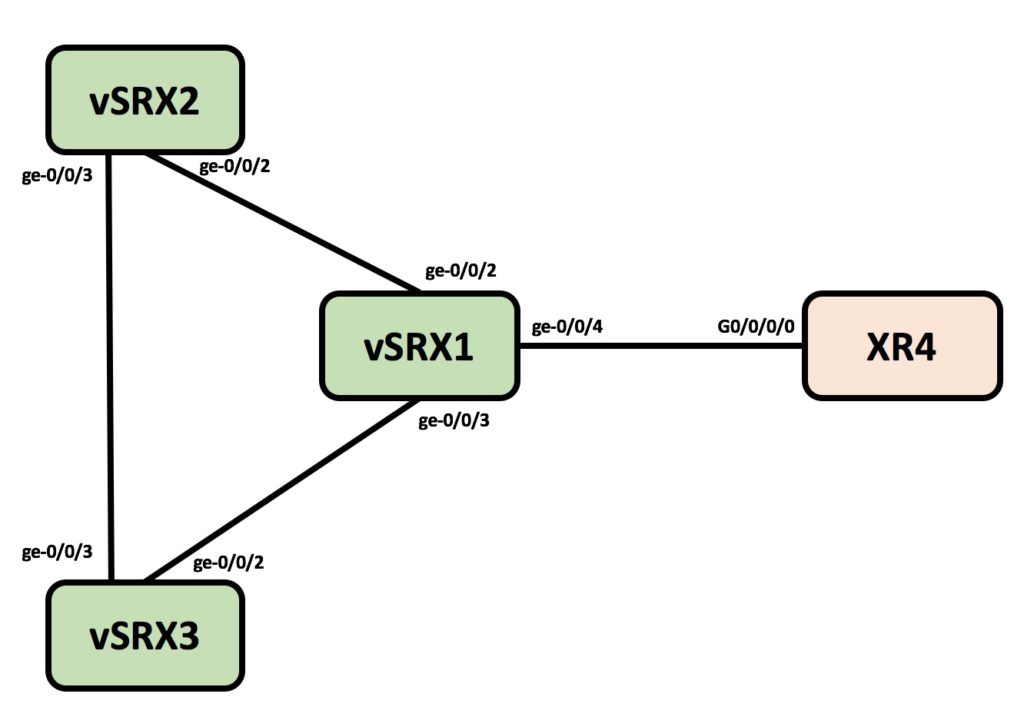
Network Topology
Below is the diagram of the desired network that we built in the previous article.
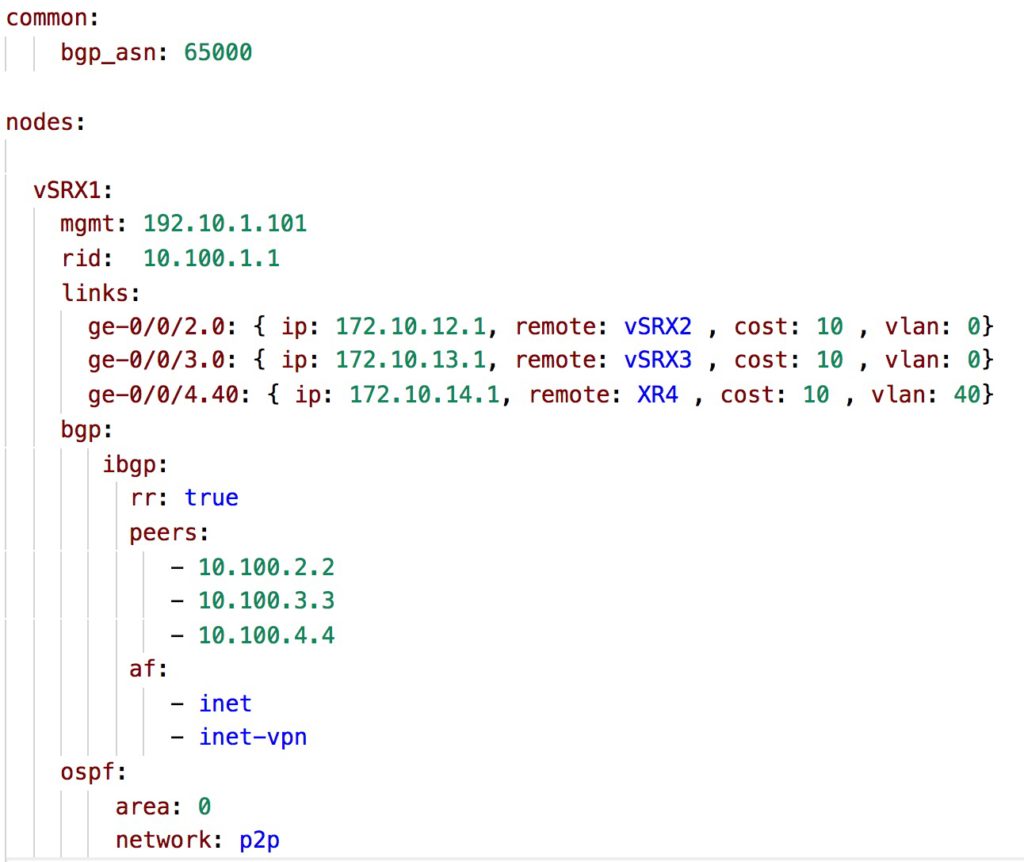
Network Data Model
Below a snippet from the network data model (nodes.yml) that describes the above network topology and which we used to build the per-node configuration and that we will use in the validation phase.
Test cases
After we deployed/pushed the configuration using Ansible and NAPALM we will perform the following validations to verify that the network state is as expected.
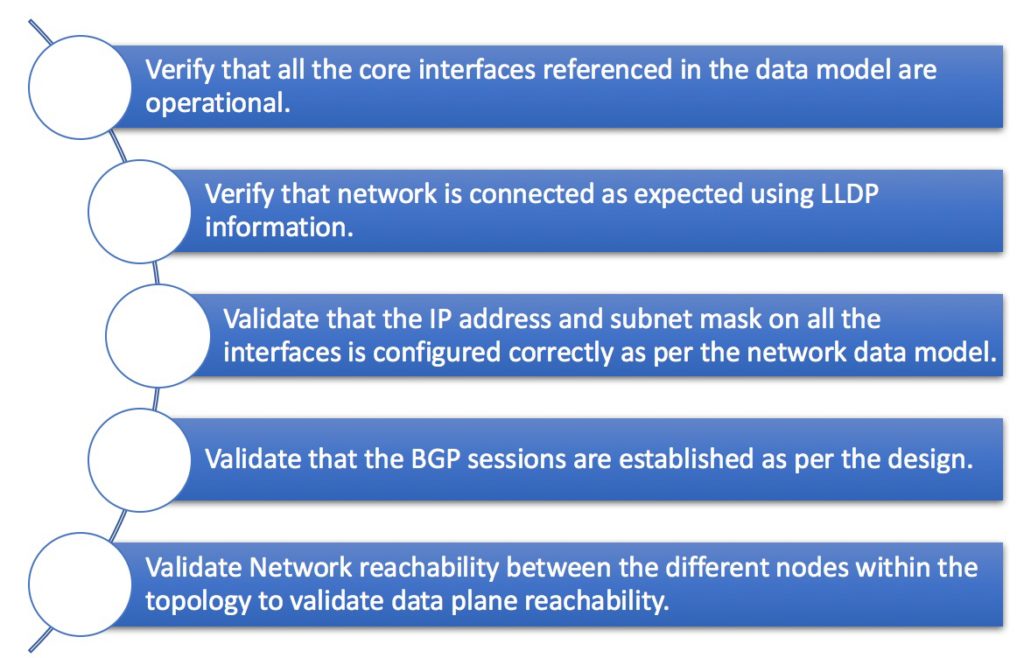
We are going to perform the validation using the following procedure
- Connect to the devices and retrieve the required output from each device using NAPALM getters.
- Run specific task(s) (using Assert module to compare between two inputs and reporting success or failure) to compare between the retrieved network state and the desired network state. These tasks can be referred to as unit tests to validate the network state.
Ansible Playbook
Below is the break down for the Ansible play-book that will perform all the above actions.
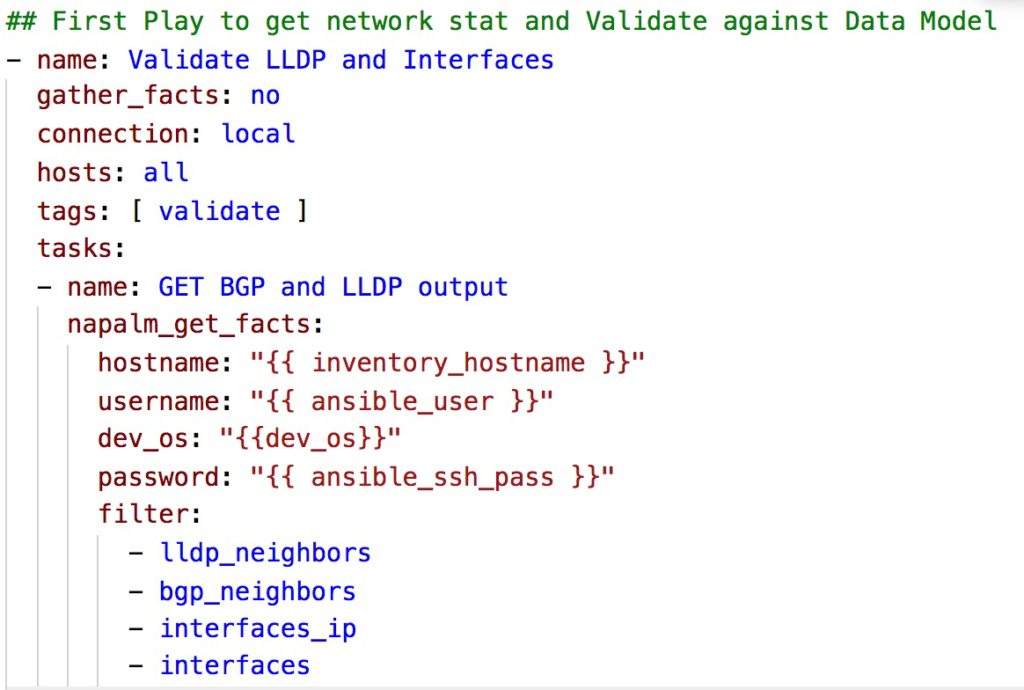
- Get Network state using NAPALM get_facts module, we are using multiple getters which will execute different show commands on the nodes and retrieve this info and register these data into different data structures.
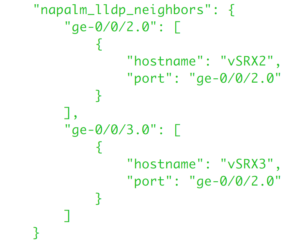
Below is an example of the lldp_neigbour data_strucutre returned by NAPALM for vSRX1 node.
- Below set of tasks, load the Network data model that we built previously and set some facts that we will use to compare the network state against the Network Design (Data model).

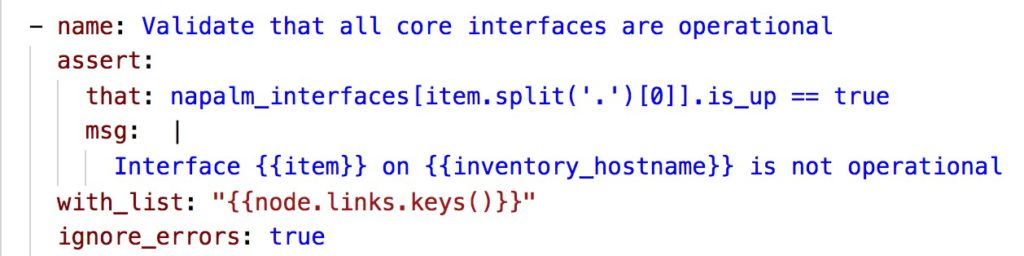
- First unit test to validate that all the interfaces are operational, we are getting the parameters from the data model and passing it into the returned NAPALM facts and verifying that the output is as expected. If the output if not true (link is down) then this task will fail and the below message will be printed to notify us that this task has failed.
- Second unit test to validate that the correct LLDP neighbor is correctly reported from the output of lldp_neigbour

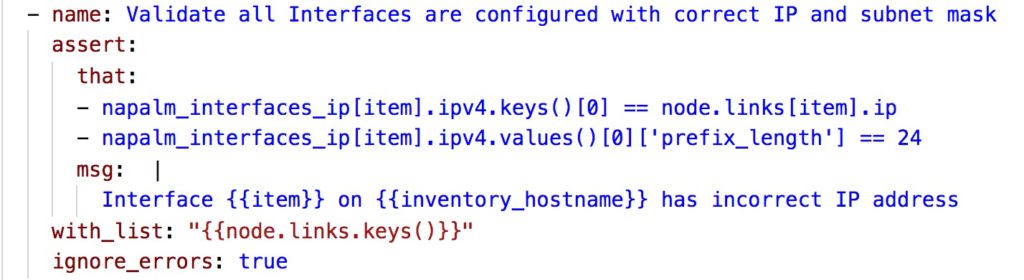
- Third unit test to validate that the router has the correct IP address configured and the correct subnet mask
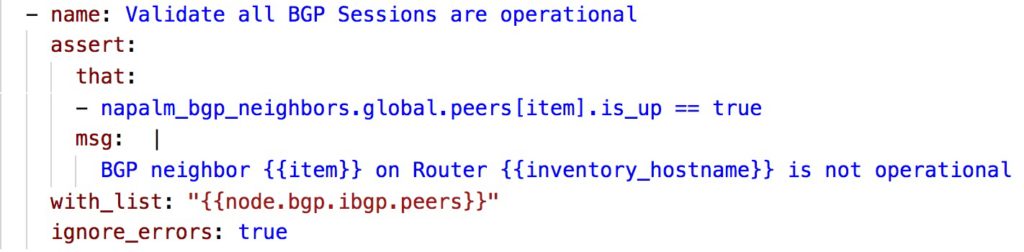
- Last unit test in this play to validate that router has the correct BGP neighbors configured and that they are operational.
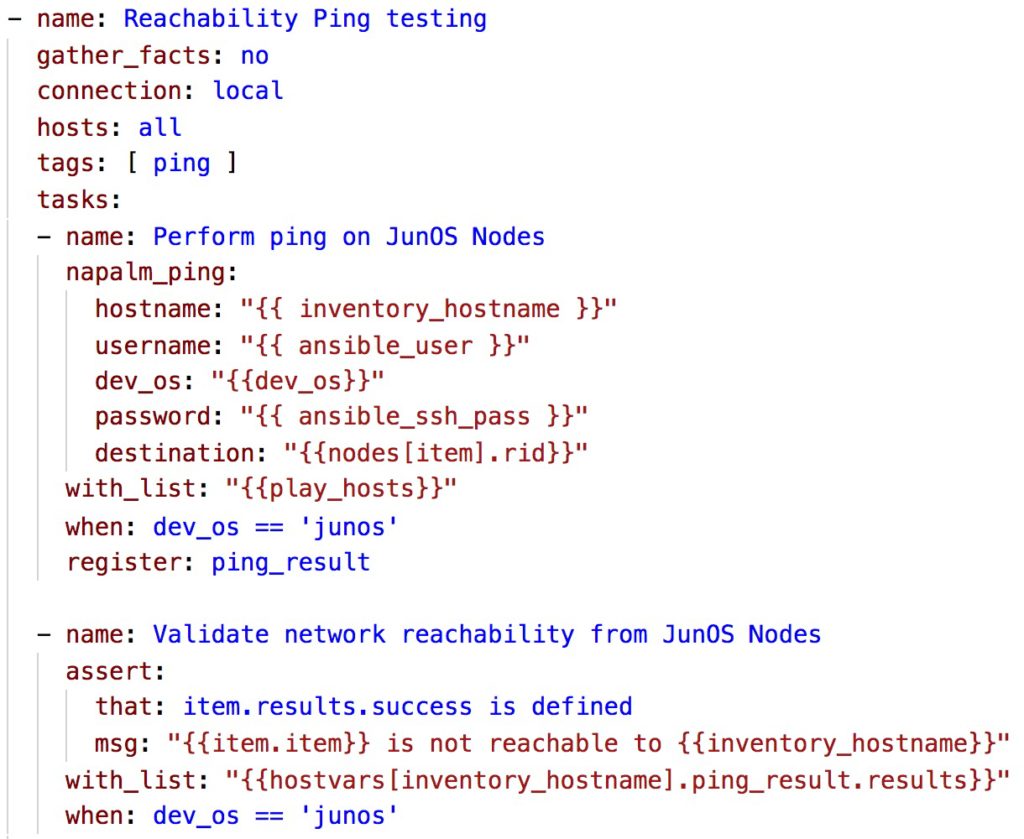
- The final play is to ping from every node to every other node in the topology to validate the end to end reachability between all the nodes. This in this task we are using NAPALM ping module to perform this check, however, this only applies to JunOS devices and it is not supported on the IOS-XR.
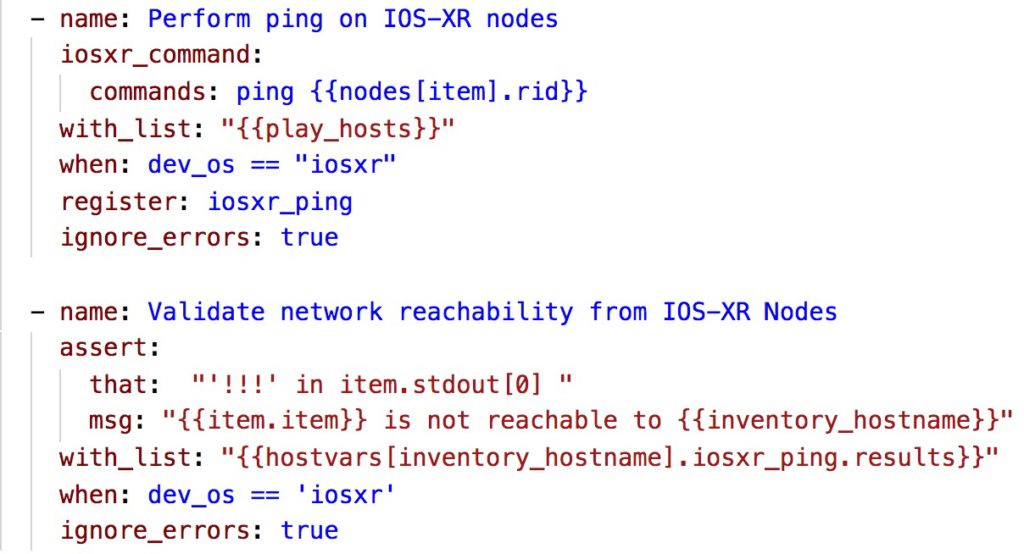
- In order to validate as well the reachability from the point of view of the IOS-XR node, we will revert back to the normal iosxr Ansible modules to execute the ping and inspect the result to see if the ping is successful. Since this module is using SSH to connect to the devices and perform the action, the return output is not well structured and we need to do pattern matching to validate that the ping is successful (unlike the JunOS case where even the ping produce a structured return value).
When we run this playbook we will get one of the following outcomes.
- Either all our unit tests (assert statements) are successful thus we can be sure that our implementation was successful and that the current network state matches our desired network design.
- Some of the unit tests will fail and we can troubleshoot to understand why this occurred and fix it, then we run the validation script again to validate the state of the network.
This framework provides assurance and reporting to the overall process of network/service provisioning and the validation is fully automated and we don’t need to tweak the validation data that need to be checked since it is automatically extracted from the Network design and we are validating the network state against this information. Thus in case we modify or add any node or any configuration in our design we don’t need to change anything in the validation script. The only changes that we might do to this part are adding more validation testing cases (validating OSPF, Validating LDP, etc…).
In the last article, I will outline the process of adding a new service (Internet Access or L3VPN) to this network and validation of that service.


Leave A Comment